OutboundClick to FB ConversionsAPI

IN this article I show you how to report an OutboundClick event to Meta’s Conversions API that contains fbc and fbp for ad attribution

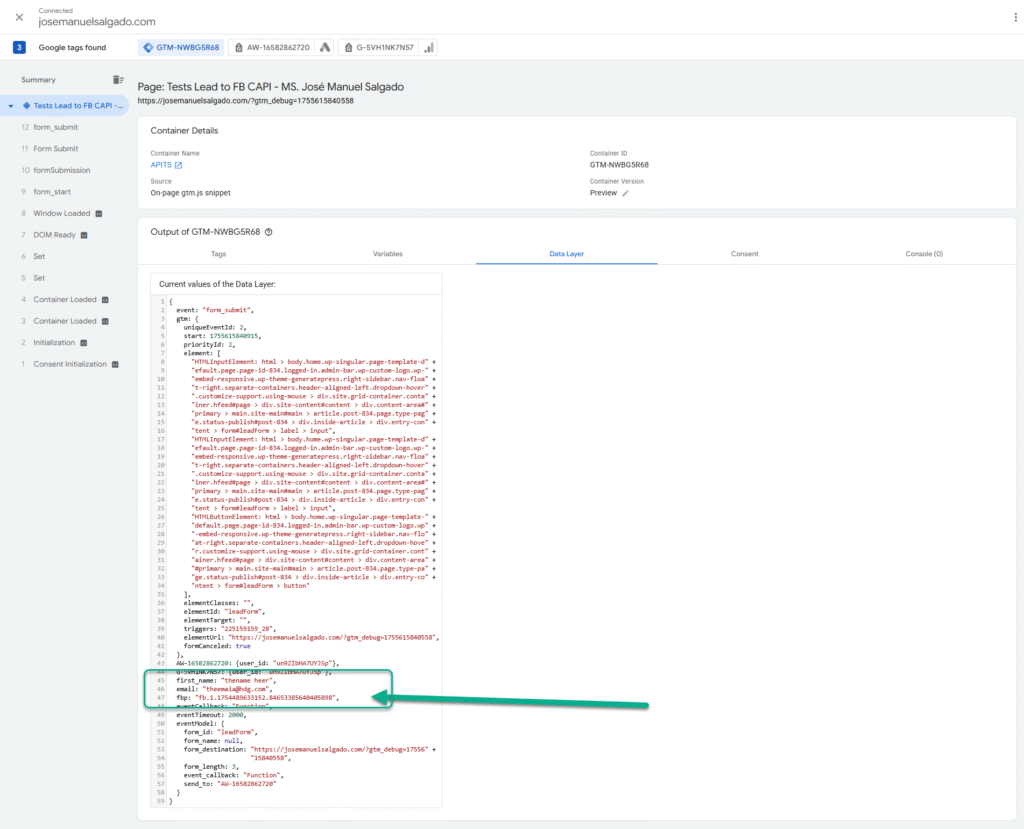
First, using a GTM script I scan the page for a specific domain and add fbc and fbp to the link

Example of an affiliate link:

https://freecash.com/?utm_source=customsource&sub1=customsub1

the script finds all links pointing to freecash.com and appends the fbc and fbp values taken from the cookies (which in turn were collected by GTM as container variables)

<script>
/* GTM Tag Name: "tag link" */
(function() {
  var affiliateDomain = 'freecash.com';
  var fbcValue = '{{fbc}}';
  var fbpValue = '{{fbp}}';

  function appendParamsToLink(link) {
    try {
      var href = link.href;
      var separator = href.indexOf('?') !== -1 ? '&' : '?';
      var newHref = href + separator + 'fbc=' + encodeURIComponent(fbcValue) + '&fbp=' + encodeURIComponent(fbpValue);
      link.href = newHref;
    } catch (e) {
      console.warn('Failed to tag link:', link.href, e);
    }
  }

  function tagAffiliateLinks() {
    var links = document.querySelectorAll('a[href*="' + affiliateDomain + '"]');
    for (var i = 0; i < links.length; i++) {
      appendParamsToLink(links[i]);
    }
  }

  // Run on DOM ready
  if (document.readyState === 'loading') {
    document.addEventListener('DOMContentLoaded', tagAffiliateLinks);
  } else {
    tagAffiliateLinks();
  }

  // Observe dynamically added links
  var observer = new MutationObserver(function(mutations) {
    for (var i = 0; i < mutations.length; i++) {
      var mutation = mutations[i];
      for (var j = 0; j < mutation.addedNodes.length; j++) {
        var node = mutation.addedNodes[j];
        if (node.nodeType === 1) {
          var newLinks = node.querySelectorAll ? node.querySelectorAll('a[href*="' + affiliateDomain + '"]') : [];
          for (var k = 0; k < newLinks.length; k++) {
            appendParamsToLink(newLinks[k]);
          }
        }
      }
    }
  });

  observer.observe(document.body, { childList: true, subtree: true });
})();
</script>

Then a click listener sends the data to my vercel function

<script>
    // This script is designed to be a Custom HTML Tag in Google Tag Manager.
    // It is triggered by a "Click - Just Links" or "Click - All Elements" trigger.

    // Helper function to get cookie values
    var getCookieValue = function(name) {
        var value = "; " + document.cookie;
        var parts = value.split("; " + name + "=");
        if (parts.length === 2) return parts.pop().split(';').shift();
        return null;
    };

    // Helper function to get URL parameter values
    var getUrlParameter = function(href, name) {
        name = name.replace(/[\[\]]/g, '\\$&');
        var regex = new RegExp('[?&]' + name + '(=([^&#]*)|&|#|$)'),
            results = regex.exec(href);
        if (!results) return null;
        if (!results[2]) return '';
        return decodeURIComponent(results[2].replace(/\+/g, ' '));
    };

    // Vercel function URL
    var vercelFunctionUrl = 'https://123-five-gamma.vercel.app/api/everflowclicktofb';

    // These variables are GTM built-in variables and will be populated at runtime.
    var clickUrl = {{Click URL}};
    var clickText = {{Click Text}};
    
    // Check for a valid URL to proceed
    if (clickUrl) {
        // Fetch the user's IP address from a third-party service
        fetch('https://api.ipify.org?format=json')
            .then(function(response) {
                return response.json();
            })
            .then(function(ipData) {
                var payload = {
                    event_name: 'OutboundClick',
                    click_url: clickUrl,
                    click_text: clickText,
                    
                    // Essential parameters for Facebook Conversions API
                    fbc: getCookieValue('_fbc') || null,
                    fbp: getCookieValue('_fbp') || null,
                    fbclid: getUrlParameter(clickUrl, 'fbclid') || null,
                    clientUserAgent: navigator.userAgent,
                    sourceUrl: window.location.href,
                    
                    // The IP address fetched from the service
                    client_ip_address: ipData.ip
                };
            
                console.log("Sending payload to Vercel function:", payload);
            
                // Now, send the complete payload to your Vercel function
                return fetch(vercelFunctionUrl, {
                    method: 'POST',
                    headers: {
                        'Content-Type': 'application/json'
                    },
                    body: JSON.stringify(payload)
                });
            })
            .then(function(response) {
                return response.json();
            })
            .then(function(responseData) {
                console.log("Response from Vercel function:", responseData);
            })
            .catch(function(error) {
                console.error("Fetch request failed:", error);
            });
    }
</script>

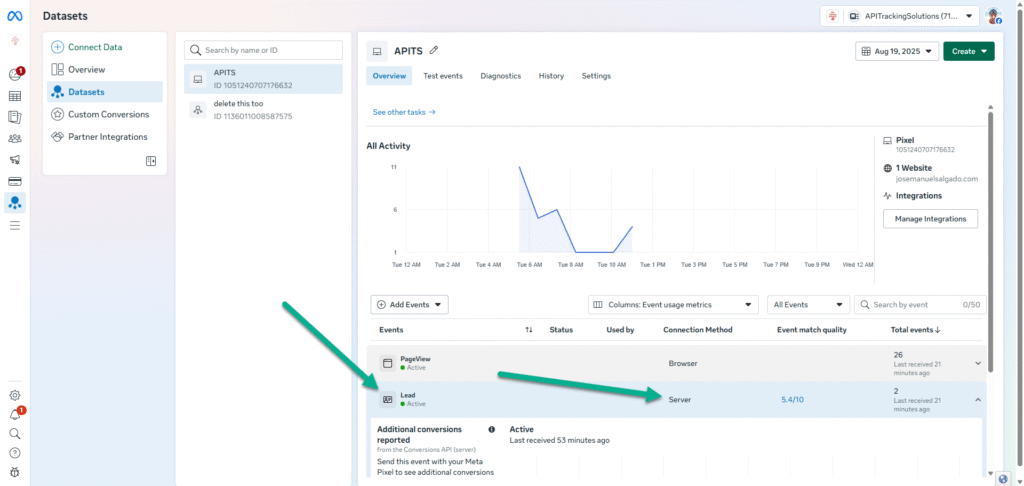
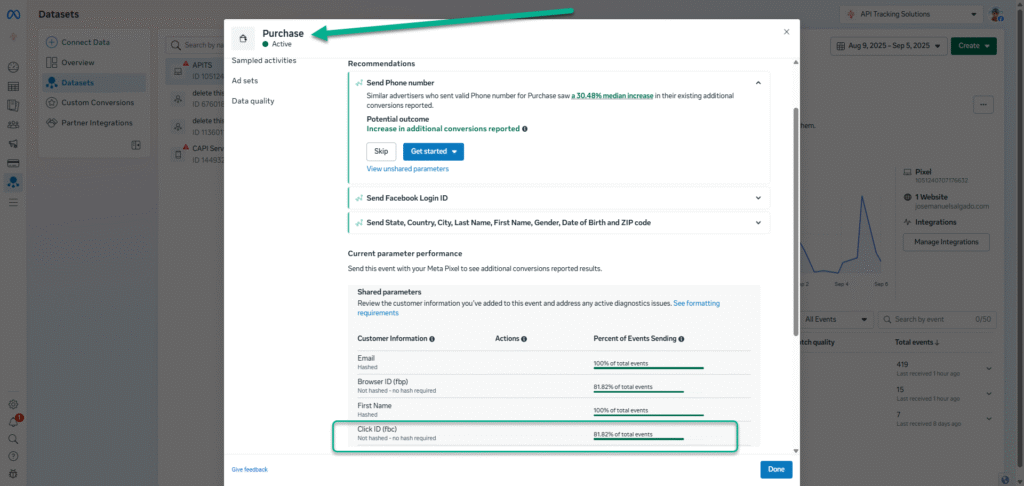
My nextJS function at vercel.com receives and formats the data, then sends the payload to my fb pixel through CAPI

// This Vercel function handles the 'OutboundClick' event for the Facebook Conversions API.
// It is a simplified version of the 'Purchase' function, as it does not need to
// interact with a third-party service like Stripe.

import crypto from 'crypto';

// Replace with your actual values from Vercel's environment variables.
// NOTE: For security, these should be set in your Vercel project settings.
const FACEBOOK_ACCESS_TOKEN = process.env.FACEBOOK_ACCESS_TOKEN; 
const FACEBOOK_PIXEL_ID = process.env.FACEBOOK_PIXEL_ID;

// Function to hash the PII data.
// Although 'OutboundClick' may not contain PII, this function is kept for consistency
// and in case a 'clickId' or similar identifier needs to be hashed.
function hash(data) {
    if (!data) return null;
    return crypto.createHash('sha256').update(data.trim().toLowerCase()).digest('hex');
}

// Define the OPTIONS method for CORS preflight requests.
// This is necessary to allow the front-end to make POST requests from a different domain.
export async function OPTIONS() {
    return new Response(null, {
        status: 204,
        headers: {
            "Access-Control-Allow-Origin": "*",
            "Access-Control-Allow-Methods": "POST, OPTIONS",
            "Access-Control-Allow-Headers": "Content-Type",
        },
    });
}

// Main POST function to handle the outbound click event.
export async function POST(request) {
    let body;
    try {
        body = await request.json();
        console.log("Received data for OutboundClick from front-end:", body);
    } catch (error) {
        return new Response(JSON.stringify({ error: "Invalid JSON in request body." }), {
            status: 400,
            headers: { 'Content-Type': 'application/json' },
        });
    }

    const { 
        clickId,
        fbclid,
        fbc,
        fbp,
        clientUserAgent,
        sourceUrl
    } = body;

    // The check for 'clickId' has been removed. The function will now proceed
    // whether or not this ID is provided by the front-end.

    try {
        // --- STEP 1: CONSTRUCT THE FACEBOOK CAPI PAYLOAD ---
        // This payload is simpler than the 'Purchase' event as it doesn't
        // contain financial or product information.
        const facebookEventData = {
            data: [{
                event_name: 'OutboundClick',
                event_time: Math.floor(Date.now() / 1000),
                event_source_url: sourceUrl,
                action_source: 'website',
                user_data: {
                    // Use client data for better attribution and deduplication
                    client_ip_address: request.headers['x-forwarded-for'] || request.headers['x-real-ip'] || request.ip,
                    client_user_agent: clientUserAgent,
                    // Use cookies for deduplication
                    fbc: fbc,
                    fbp: fbp,
                },
                custom_data: {
                    // Use the unique click ID for event tracking and debugging
                },
            }],
            // Use this optional parameter to ensure your events are deduplicated correctly
            test_event_code: null // Use 'TESTxxxx' from your Events Manager for testing
        };

        // --- STEP 2: SEND DATA TO FACEBOOK CAPI ---
        const fbEndpoint = `https://graph.facebook.com/v20.0/${FACEBOOK_PIXEL_ID}/events?access_token=${FACEBOOK_ACCESS_TOKEN}`;

        const fbResponse = await fetch(fbEndpoint, {
            method: 'POST',
            headers: {
                'Content-Type': 'application/json',
            },
            body: JSON.stringify(facebookEventData),
        });

        const fbResponseData = await fbResponse.json();

        if (fbResponse.ok) {
            console.log("OutboundClick event sent to Facebook successfully:", fbResponseData);
        } else {
            console.error("Failed to send OutboundClick event to Facebook:", fbResponseData);
        }

        // --- STEP 3: RESPOND TO FRONT-END ---
        return new Response(JSON.stringify({ 
            message: 'OutboundClick event processed and sent to Facebook', 
            facebookResponse: fbResponseData
        }), {
            status: 200,
            headers: { 
                "Access-Control-Allow-Origin": "*",
                'Content-Type': 'application/json' 
            },
        });

    } catch (error) {
        console.error("Error in CAPI OutboundClick function:", error);
        return new Response(JSON.stringify({ error: error.message }), {
            status: 500,
            headers: { 
                "Access-Control-Allow-Origin": "*",
                'Content-Type': 'application/json' 
            },
        });
    }
}


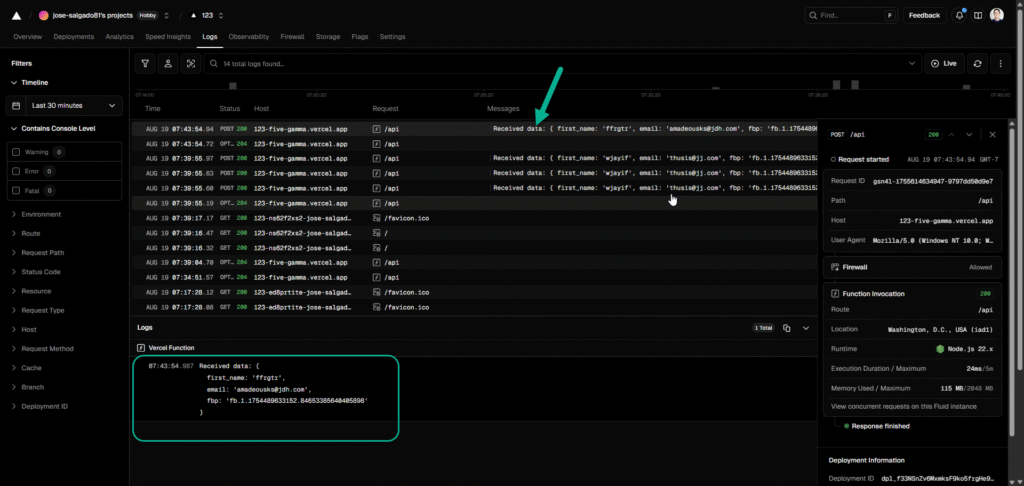
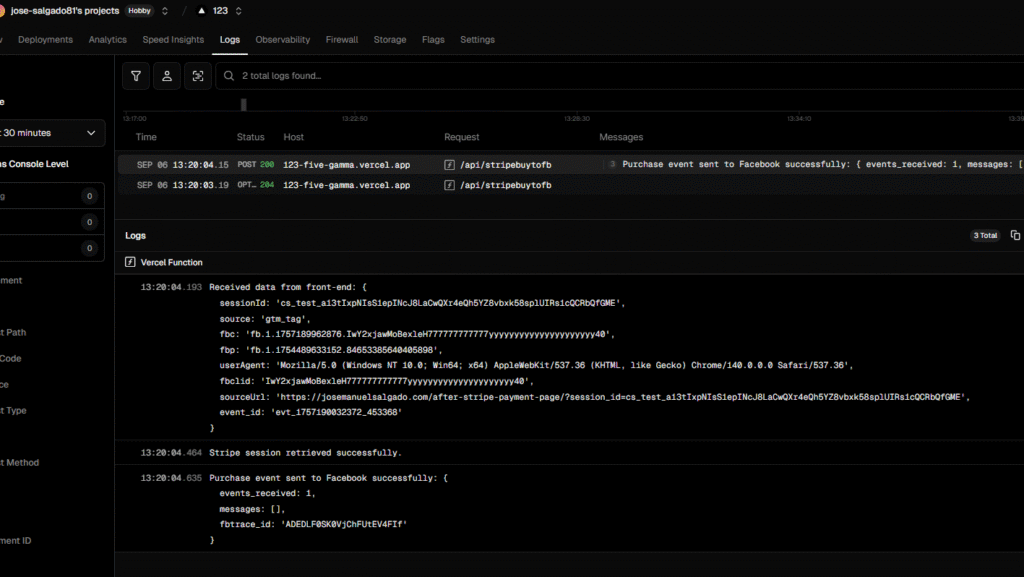
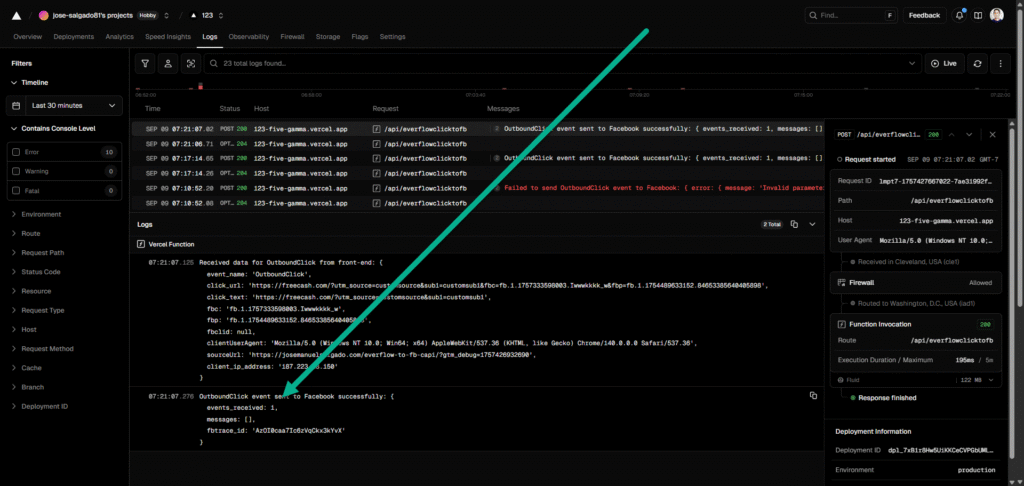
I receive 2 answers one confirms data received at vercel:

Received data for OutboundClick from front-end: {
  event_name: 'OutboundClick',
  click_url: 'https://freecash.com/?utm_source=customsource&sub1=customsub1&fbc=fb.1.1757333598003.Iwwwkkkk_w&fbp=fb.1.1754489633152.84653385640405898',
  click_text: 'https://freecash.com/?utm_source=customsource&sub1=customsub1',
  fbc: 'fb.1.1757333598003.Iwwwkkkk_w',
  fbp: 'fb.1.1754489633152.84653385640405898',
  fbclid: null,
  clientUserAgent: 'Mozilla/5.0 (Windows NT 10.0; Win64; x64) AppleWebKit/537.36 (KHTML, like Gecko) Chrome/140.0.0.0 Safari/537.36',
  sourceUrl: 'https://josemanuelsalgado.com/everflow-to-fb-capi/?gtm_debug=1757426932690',
  client_ip_address: '187.223.18.150'
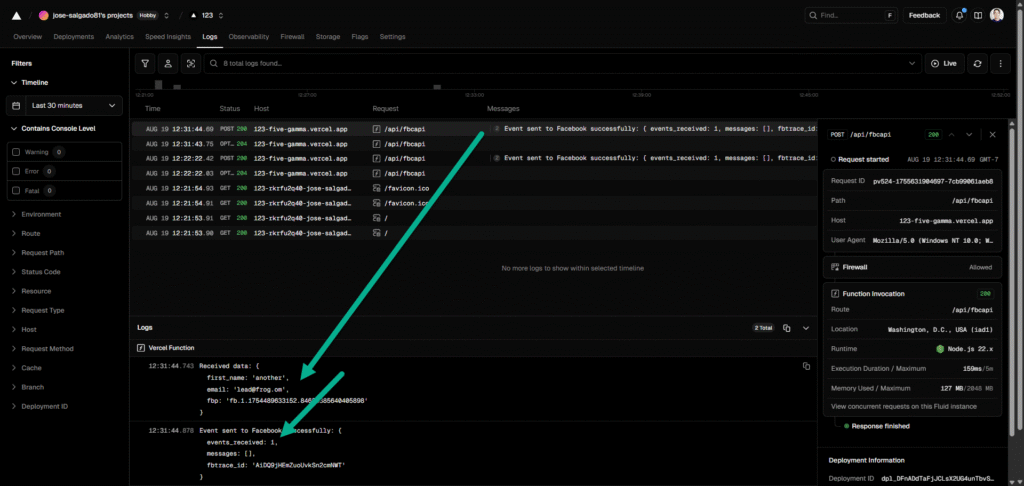
}

and finally FB API confirms event reception

OutboundClick event sent to Facebook successfully: {
  events_received: 1,
  messages: [],
  fbtrace_id: 'AD7Vm2FF1BhLuOWS55QGYAY'
}

Available for hire. If you want me to implement this automation for your business (or if you want a guided demo)

Lead to FB CAPI

Cost

GTM container 0$,

nextJS serverless function at Vercel 0$

Meta Conversions API, FB CAPI APP

First we introduce a simple HTML form:

<form id="leadForm">
  <label>
    First Name:
    <input type="text" name="first_name" required>
  </label>
  <br>
  <label>
    Email:
    <input type="email" name="email" required>
  </label>
  <br>
  <button type="submit">Submit</button>
</form>


then a code that collects cookies and form field values and pushes them to the data layer, it also sends the data to a Vercel function with a POST

<script>
document.addEventListener('DOMContentLoaded', function () {
  const form = document.getElementById('leadForm');
  // Use the correct endpoint for your function
  const endpoint = 'https://123-five-gamma.vercel.app/api/fbcapi'; 

  if (form) {
    function getCookie(name) {
      const value = "; " + document.cookie;
      const parts = value.split("; " + name + "=");
      if (parts.length === 2) {
        return parts.pop().split(";").shift();
      }
      return null;
    }

    form.addEventListener('submit', function (e) {
      e.preventDefault();

      const firstName = form.elements.first_name.value;
      const email = form.elements.email.value;
      const fbp = getCookie('_fbp');

      const formData = {
        first_name: firstName,
        email: email,
        fbp: fbp
      };

      // Push data to the data layer for GTM
      window.dataLayer = window.dataLayer || [];
      window.dataLayer.push({
        event: 'formSubmission',
        ...formData
      });

      // Send a POST request to your Vercel function
      fetch(endpoint, {
        method: 'POST',
        headers: {
          'Content-Type': 'application/json'
        },
        body: JSON.stringify(formData)
      })
      .then(response => {
        if (response.ok) {
          console.log('Data sent to Vercel successfully!');
        } else {
          console.error('Failed to send data to Vercel.');
        }
      })
      .catch(error => {
        console.error('Network error:', error);
      });
    });
  }
});
</script>

Vercel function log for the request:


Received data: {
  first_name: 'ffrgtr',
  email: 'ajuj@jdh.com',
  fbp: 'fb.1.1754489633152.84653385640405898'
}

the values are also now available in the data layer for further automation in gtm

However, we go with the vercel way . now the Vercel function has to be send a modified to POST to fb capi (access token and pixel id needed)

the followin updated vercel function has the Fb access token and includes the pixel id, it also normalizes the lead parameters so that they are accepted by FB CAPi


// You will need to install the 'crypto' library to hash data
// npm install crypto

import crypto from 'crypto';

// Replace with your actual values
const FACEBOOK_ACCESS_TOKEN = 'EAAUmJiUQKVgBPFtnfTiI9OQZBIUUUUUUUUOuhGgZBnMZCaR2WxfK8zZCZBVsMV8CiV8gUWeT0PYXt12EqpTlZBpLy7nvC0KXSz51aPRSLZAbkqIGS6iSpUcri3Cf25j8reIlmfvROjtOuRVYRc7Tk'; 
const FACEBOOK_PIXEL_ID = '105100000000076632';

// Function to hash the PII data
function hash(data) {
    if (!data) return null;
    return crypto.createHash('sha256').update(data.trim().toLowerCase()).digest('hex');
}

export async function OPTIONS() {
    return new Response(null, {
        status: 204,
        headers: {
            "Access-Control-Allow-Origin": "*",
            "Access-Control-Allow-Methods": "POST, OPTIONS",
            "Access-Control-Allow-Headers": "Content-Type",
        },
    });
}

export async function POST(request) {
    const body = await request.json();
    console.log("Received data:", body);

    const { first_name, email, fbp } = body;

    // Build the data payload for Facebook CAPI
    const facebookEventData = {
        data: [{
            event_name: 'Lead', // or 'Purchase', 'CompleteRegistration', etc.
            event_time: Math.floor(Date.now() / 1000), // Current timestamp in seconds
            user_data: {
                fn: hash(first_name),
                em: hash(email),
                fbp: fbp,
                // Add other user data if available (e.g., phone number, last name, city)
            },
            custom_data: {
                // Add any custom properties (e.g., value, currency)
            },
            action_source: 'website',
        }],
    };

    // Send the data to Facebook CAPI
    const fbEndpoint = `https://graph.facebook.com/v20.0/${FACEBOOK_PIXEL_ID}/events?access_token=${FACEBOOK_ACCESS_TOKEN}`;

    try {
        const fbResponse = await fetch(fbEndpoint, {
            method: 'POST',
            headers: {
                'Content-Type': 'application/json',
            },
            body: JSON.stringify(facebookEventData),
        });

        const fbResponseData = await fbResponse.json();

        if (fbResponse.ok) {
            console.log("Event sent to Facebook successfully:", fbResponseData);
        } else {
            console.error("Failed to send event to Facebook:", fbResponseData);
        }

    } catch (error) {
        console.error("Error sending event to Facebook:", error);
    }

    return new Response(JSON.stringify({ message: 'Data received and processed', data: body }), {
        status: 200,
        headers: { 'Content-Type': 'application/json' },
    });
}

After submitin a Lead, happily Vercel logs confirm lead data collection and confirmation from CAPi event was received at FB:

in the Events Manager there is confirmation a correct Lead was obtained:


the vercel function hashed parameters that needed hashing, now it is just a matter of including more data in the event, as well as the fbc if we want to attribute to a fb ad

Available for hire. If you want me to implement this automation for your business (or if you want a guided demo)

Stripe Purchase to FB Conversions API

In this article, I show you how to report a conversion event (a Purchase) to the Facebook ConversionsAPI generated by a user who clicked on my FB ad and purchased on my site using Stripe’s Buy button. The conversion data includes the value of the event as well as Personal Identifiers that will help the FB targeting algorithm improve its precision and understand my audiences better. The event also contains attribution data, such as the fbc and fbp, so that I’m telling FB CAPI which exact ad generated the sale. This training data will improve my ROAS.

How it works:

I embedded the Stripe’s Buy button code on my landing page, which also has the Meta pixel installed and a Google Tag Manager container. As the user lands on the page coming from a FB Ad, the GTM container records the fbp and fbc values as GTM variables, then the user clicks on the Buy button (find button below) and goes to the Stripe checkout flow, when he completes the purchase Stripe takes him to my predefined thank you page

Stripe automatically appends the session Id to the thank you page, so when the user lands on the thank you page, a GTM script triggered by a PageView (see code below) will send the session id, as well as the fbc, fbp, fbclid, user agent and an eventId to a serverless function at vercel.com.

<script>
    var url = new URL(window.location.href);
    var sessionId = url.searchParams.get('session_id');

    if (sessionId) {
        var fbcid = '{{fbcid}}';
        var fbc = '{{fbc}}';
        var fbp = '{{fbp}}';
        var userAgent = navigator.userAgent;
        var sourceUrl = window.location.href;

        // Generate a unique event_id
        var eventId = 'evt_' + Date.now() + '_' + Math.floor(Math.random() * 1000000);

        console.log("Stripe Session ID found:", sessionId);
        console.log("Facebook Tracking Data Captured by GTM:");
        console.log('fbcid: ' + (fbcid || 'Not Found'));
        console.log('fbc: ' + (fbc || 'Not Found'));
        console.log('fbp: ' + (fbp || 'Not Found'));
        console.log("User Agent:", userAgent);
        console.log("Source URL:", sourceUrl);
        console.log("Event ID:", eventId);

        var endpoint = 'https://123-five-gamma.vercel.app/api/stripebuytofb';

        fetch(endpoint, {
            method: 'POST',
            headers: {
                'Content-Type': 'application/json'
            },
            body: JSON.stringify({
                sessionId: sessionId,
                source: 'gtm_tag',
                fbc: fbc,
                fbp: fbp,
                userAgent: userAgent,
                fbclid: fbcid,
                sourceUrl: sourceUrl,
                event_id: eventId // Include event_id
            })
        })
        .then(function(response) {
            return response.json();
        })
        .then(function(data) {
            console.log('Vercel function response:', data);
        })
        .catch(function(error) {
            console.error('An error occurred while sending data to Vercel:', error);
        });

    } else {
        console.warn('Stripe Session ID not found in the URL. CAPI event not sent.');
    }
</script>

The vercel function (see code below) will use the session Id to ask Stripe’s API the deatils of the Purchase, then it will take all the parameters and format them according to FB CAPI’s requirements (including hashing the personal info), it uses my Meta pixeId and token to authenticate and post the Purchase event,

// Import necessary libraries.
// You will need to install 'crypto' and 'stripe' if they're not already installed.
// npm install crypto stripe

import Stripe from 'stripe';
import crypto from 'crypto';

// Replace with your actual values from Vercel's environment variables.
const STRIPE_SECRET_KEY = process.env.STRIPE_SECRET_KEY;
const FACEBOOK_ACCESS_TOKEN = process.env.FACEBOOK_ACCESS_TOKEN; 
const FACEBOOK_PIXEL_ID = process.env.FACEBOOK_PIXEL_ID;

// Create a new Stripe instance.
const stripe = new Stripe(STRIPE_SECRET_KEY);

// Function to hash the PII data.
// It's crucial to hash PII before sending it to Facebook.
function hash(data) {
    if (!data) return null;
    return crypto.createHash('sha256').update(data.trim().toLowerCase()).digest('hex');
}

// Define the OPTIONS method for CORS preflight requests.
// This is necessary to allow the front-end to make POST requests from a different domain.
export async function OPTIONS() {
    return new Response(null, {
        status: 204,
        headers: {
            "Access-Control-Allow-Origin": "*",
            "Access-Control-Allow-Methods": "POST, OPTIONS",
            "Access-Control-Allow-Headers": "Content-Type",
        },
    });
}

// Main POST function to handle the purchase event.
export async function POST(request) {
    let body;
    try {
        body = await request.json();
        console.log("Received data from front-end:", body);
    } catch (error) {
        return new Response(JSON.stringify({ error: "Invalid JSON in request body." }), {
            status: 400,
            headers: { 'Content-Type': 'application/json' },
        });
    }

    const { 
        sessionId,
        fbclid,
        fbc,
        fbp,
        clientUserAgent,
        sourceUrl
    } = body;

    // Check for essential data from the front-end.
    if (!sessionId) {
        return new Response(JSON.stringify({ error: "No sessionId provided." }), {
            status: 400,
            headers: { 'Content-Type': 'application/json' },
        });
    }

    try {
        // --- STEP 1: RETRIEVE PURCHASE DATA FROM STRIPE ---
        // Retrieve the full Stripe session, including the payment details and line items.
        const session = await stripe.checkout.sessions.retrieve(sessionId, {
            expand: ['payment_intent', 'line_items'],
        });

        // Ensure the payment was successful.
        if (session.payment_intent.status !== 'succeeded') {
            return new Response(JSON.stringify({ error: 'Payment not succeeded' }), {
                status: 400,
                headers: { 'Content-Type': 'application/json' },
            });
        }

        console.log("Stripe session retrieved successfully.");

        // Extract and process customer and purchase data.
        const customerDetails = session.customer_details;
        const purchaseAmount = session.amount_total;
        const purchaseCurrency = session.currency;
        const lineItems = session.line_items.data;

        // --- STEP 2: CONSTRUCT THE FACEBOOK CAPI PAYLOAD ---
        const facebookEventData = {
            data: [{
                event_name: 'Purchase',
                event_time: Math.floor(Date.now() / 1000),
                event_source_url: sourceUrl,
                action_source: 'website',
                user_data: {
                    // Hash PII for privacy and compliance
                    em: hash(customerDetails?.email),
                    fn: hash(customerDetails?.name),
                    ph: hash(customerDetails?.phone),
                    // Use client data for better attribution and deduplication
                    client_ip_address: request.headers['x-forwarded-for'] || request.headers['x-real-ip'] || request.ip,
                    client_user_agent: clientUserAgent,
                    // Use cookies for deduplication
                    fbc: fbc,
                    fbp: fbp,
                },
                custom_data: {
                    currency: purchaseCurrency.toUpperCase(),
                    value: (purchaseAmount / 100).toFixed(2), // Convert from cents to dollars
                    // Process line items into a format Facebook can use
                    contents: lineItems.map(item => ({
                        id: item.price.product, // Assuming the product ID is what you need
                        quantity: item.quantity,
                        item_price: (item.price.unit_amount / 100).toFixed(2)
                    })),
                    content_type: 'product',
                    content_ids: lineItems.map(item => item.price.product),
                    num_items: lineItems.reduce((total, item) => total + item.quantity, 0),
                },
            }],
            // Use this optional parameter to ensure your events are deduplicated correctly
            test_event_code: null // Use 'TESTxxxx' from your Events Manager for testing
        };

        // --- STEP 3: SEND DATA TO FACEBOOK CAPI ---
        const fbEndpoint = `https://graph.facebook.com/v20.0/${FACEBOOK_PIXEL_ID}/events?access_token=${FACEBOOK_ACCESS_TOKEN}`;

        const fbResponse = await fetch(fbEndpoint, {
            method: 'POST',
            headers: {
                'Content-Type': 'application/json',
            },
            body: JSON.stringify(facebookEventData),
        });

        const fbResponseData = await fbResponse.json();

        if (fbResponse.ok) {
            console.log("Purchase event sent to Facebook successfully:", fbResponseData);
        } else {
            console.error("Failed to send Purchase event to Facebook:", fbResponseData);
        }
        // --- STEP 4: RESPOND TO FRONT-END ---
        return new Response(JSON.stringify({ 
            message: 'Purchase event processed and sent to Facebook', 
            stripeSession: session,
            facebookResponse: fbResponseData
        }), {
            status: 200,
            headers: { 
                "Access-Control-Allow-Origin": "*",
                'Content-Type': 'application/json' 
            },
        });

    } catch (error) {
        console.error("Error in CAPI function:", error);
        return new Response(JSON.stringify({ error: error.message }), {
            status: 500,
            headers: { 
                "Access-Control-Allow-Origin": "*",
                'Content-Type': 'application/json' 
            },
        });
    }
}

I get 3 answers, one confirms having sent the data, the second confirms the stripe session access and the 3rd confirms successful post to FB CAPI:

a few instants later I can see the event arriving server-side on the FB Events Manager

Since it contains the fbc, the Facebook Ads manager will know to which ad the Purchase should be attributed to!

Available for hire. If you want me to implement this automation for your business (or if you want a guided demo)

Olla de cocción lenta

Esta olla está muy buena para hacer los frijoles y guisos creativos con múltiples ingredientes.

Haz click en el siguiente link para comprarla

https://meli.la/1JS67gh

(este es un test post de link de afiliados de mercado libre)

Conversational Knowledge (Local AI)

An applied data science research project

Introduction

One of the few useful applications of generative AI is text summarization and subsequent meaning abstraction. Organizations managing topic-specific knowledge can improve the educational experience of their audience by offering a conversational interface (a chatbot) that allows users to reach understanding through natural language conversations.

Companies such as OpenAI, Google and Microsoft sell subscription access to their Large Language Models (LLMs). The service allows users to use the engine of the LLMs on their own knowledge bases. Then, other platforms offer chatbot deployment solutions that will serve the customized LLMs in the form of a chatbot on the website.

IBM.com administering knowledge through a chatbot

These solutions have a recurrent cost, and the educational infrastructure is on a permanent lease and never fully owned.

However, some LLMs are available to be run locally and for free (examples include Llama and Granite)

In this project we want to find out if we can create a chatbot that uses topic-specific knowledge using free, open-source technologies, so that any person or organization custodian to a knowledge base can deploy this solution at a near zero cost.

Knowledge: The Divine Comedy of Dante Alighieri, translated by Charles Eliot Norton

I’ll use this book as the knowledge for several reasons:

  • It is Public Domain, so there is no copyright infringement if we use it to test our prototype.
  • It is already curated as a txt file. While our bot can digest pdfs and even scanned pages, a clean txt file is much lighter to manage.
  • Since commercial LLMs such as ChatGPT have been trained with the book, we will be able to contrast how our local AI leverages direct access to the raw file and determine if its better.
  • Using the text file will allow us to see retrieval augmented generation (RAG) in action, our chatbot should be able to do literal quotes and tell us on which page to find the source.
  • We examine the possible application of the bot as a “book companion” to assist readers in their understanding of a book.


Objective

Implement a near zero cost chatbot that uses technologies that are free to use and hold: Linux Ubuntu, Docker, Ollama, Llama3, OpenWebUI, Llava, docling,

(As a secondary objective, we also explore the possibility of inducing the chatbot to use the Socratic method to guide a productive conversation with the learner.) / out of scope

The depth and breadth of the knowledge will be limited by the capacities of the RAG component. No, main limitation will be the hardware serving the chatbot and the LLM (the hosting VPS)

Knowledge file formats: pdf, docx, mp3, mp4, ppt, .png.

Limitations

if you have lots of traffic and multiple simultaneous users it uses lots of energy (electricity) and hardware resources, so you have to scale considering compute and environmental dimensions

Methodology

Before deploying it to an online server, we shall develop the containerized solution locally.

Table 1. Tech stack

ComponentLicensePurposeNotes
Ubuntu 24.04.3 LTS OSLinux distribution based primarily on free and open-source softwareLinux Ubuntu is the host operating system or the primary environment where all the other components are installedSimple to install and replicate
OllamaMIT License. Almost entirely unrestricted and designed to be used by anyone, for any purposeThe core Ollama software is the framework that allows to download and run modelsIt manages the LLMs.
DockerOpen source, Apache-2.0 LicenseDocker allows to run the OpenWebUI application in a self-contained unit (a container) that is entirely separate from the Ubuntu operating systemIt safely contains the OpenWEbUI component
OpenWebUIYou are free to use, modify, and redistribute the code for personal projects, businesses, or internal use as long as you do not remove or alter the “Open WebUI” branding. LicenseWeb-based chat interface designed to manage and interact with LLMs. It provides a feature-rich, ChatGPT-style experience for self-hosted AI deployments, prioritizing privacy, data sovereignty, and customizabilityGives the chatgpt user experience.
ngrokFree to use, not open sourceNgrok is a secure, public gateway to the internet, so that your local AI can be accessed through any browser or device in the world.Gives your bot a sharable and persistent URL
Llama3 8bMeta Llama Community License (a bespoke, conditional open-source license).
General Use: It is generally permissive for both research and commercial use
Llama 3 is a family of powerful open-source large language models (LLMs) developed by Meta. The most accessible version for running on consumer hardware (laptops, desktops) is Llama 3 8B (8 billion parameters).While llama4 is now available it requires massive resources, llama3 is more appropriate. You can also use deepseek, granite, gemma, etc
LLavaMIT License. Free to use.Large Language and Vision Assistant. is a prominent open-source model that combines a large language model (like Llama) with a vision encoder to handle image and text inputs.we use this to interpret screenshots, diagrams, hand written text, images.
The divine comedyPublic domain, no copyrightIts the Knowledge Base of out chatbotOur subject matter source knowledge
Dante Alighieri: bio-bibliographiePublid domain, no copyrightAnother text file for knowledgeMore topic-specific knowledge to enrich answers. Written in Italian, perfect to test multilingual capabilities.

LLava will be used to generate embeddings from the screenshots

Install Ubuntu, Install Ollama, Install Docker Install OpenWebUI Install Llava Install docling

after installation….

First, launch Ollama on Ubuntu:

sudo systemctl start ollama

Verify Ollama is running:

sudo systemctl status ollama

Launch OpenWebUI:

docker start open-webui

On a browser on the same machine, navigate to http://localhost:8080/

to stop working on it, shut down openwebui and ollama:

docker stop open-webui
sudo systemctl stop ollama

To be able to learn from screenshots, diagrams and image files in general, we install LlaVa

ollama run llava

ngrok http 8080 --domain=nonblamable-nonsingular-rachael.ngrok-free.dev


the image is processed by LLava (Large Language and Vision Assistant)

Hardware Resources

Using Llava+LLM+Ollama is resource intensive, about 14GB Ram+5 GB VRam

Multilingual capabilities

If the selected model was trained on multiple languages, the bot will be multilingual out of the box, just prompt it on the desired language:

Context Supplementation with Web Search

We add a web search capacities to the bot to allow it to increase its context before answering, we choose Tavily (a free web search API)

Results


Test the local AI at https://nonblamable-nonsingular-rachael.ngrok-free.dev/

Conclusion

References

Support

Need help setting up this solution on your site?

email me

Privacy Policy | Affiliate Disclaimer | Terms & Conditions | Opt-Out Preferences